
attic, part 7: priming & painting
03.05 - 04.05 impressing a paint salesman with our mad excel skillz
 click to see the full photo galleryOne of the best parts of finishing the taping, mudding, sanding, and texturing (besides being done, natch), is moving on to the next phase: painting!
But first, priming. Prep work isn't exactly my favorite thing and when possible, I skip the priming step. But this wasn't a case where we could do that, of course. And, because we were painting the closets, too, they needed to be primed, also. At which point we pretty much figured out that we having been doing one large room, but actually one large room and two smaller ones -- the main room, the long eave closet, and the two shorter closets (counted as one). I mean, think about it: the main room is 558 sq.ft., the long closet is 115 sq.ft., and the two smaller closets are each 42 sq.ft. That's 757 sq.ft, about the size of our first apartment!
If you're a regular follower of all our home improvement [mis]adventures, you know that I am not afraid of color. In fact, if you've ever had to listen to my diatribes about people who choose, when presented with the millions of color options available to them, white or off-white, then you know that it's a subject that I'm totally passionate about. Color Is Your Friend.
It should come as no surprise, then, that Sal and I decided on 4 different colors. What will come as a surprise is the relatively subdued nature of our choices.
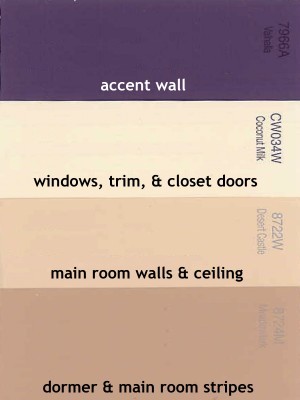 Keep in mind that the colors didn't scan true and that various monitors display color differently (even on my monitor, they came out more yellow than they actually are), but you get the gist. Because there are only two windows in the attic, we needed to keep things as light as possible. But because this room will be our retreat from the world, we also wanted it to be warm, especially on those cold, rainy days when we're curled up in the dormer in our pj's with a cup of cocoa and a good book. Or coffee, if that's more your speed. In fact, the tannish colors were inspired by the fancy schmancy espresso drinks that are the mainstay of the Pacific Northwesterner's daily ritual. And then, of course, the splash of dark purple, because duh.
Anyway, there were measurements to take and areas to figure out and quantities to calculate, which means of course: spreadsheet! Huzzah, huzzah, it was time to whip out my trusty ol' Excel and put together a snappy spreadsheet, complete with color-coding and itemized filters. Am I a complete and total dork? Why yes, yes I am.
BUT! Not as dorky as you might think. After conferring with our handy paint sales guy over at Miller Paint (buy local, buy quality) about paint sheens and primer types and deciding what we needed of everything, he asked for how much we needed of each one. At which point I pulled my spreadsheet printout out of my purse and laid it out on the counter for him. I started to read off the quantities we'd need for each color and he interrupted me, putting his hand down in the middle of the sheet. "You know, I have to tell you," he said, "I've been doing this for almost 15 years now and I've never seen anyone as organized as this. It's really great." I think he might have even choked up over it, and I'm fairly certain I saw a tear in his eye.
We enlisted the aid of our super friend extraordinaire once again, who helped us prime everything and kept us laughing for good measure. And introduced us to the wonders of the paint pad, her painting weapon of choice. She can paint walls, corners, trim, and windows with this one tool that it takes us lesser mortals a combination of brushes, rollers, and foam to accomplish. And thanks to another very good and generous friend, who had five gallons of off-white paint leftover from painting her house, we were able to paint the closet interiors absolutely free. (We had originally planned to get paint from Metro for the closets; if you're looking for affordable latex paint, your local paint recycler can be a great resource and they usually offer a fair selection of colors.)
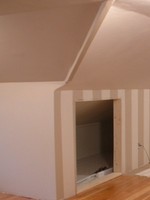
Other than the accent wall and the stripes (and the dormer being a darker color than the rest of the room), we didn't do any special wall finishes like we did in the living and dining room so the painting itself was pretty straightforward. However, if you'll recall, we had signed up to have the fantabulously awesome stars painted on our ceiling way back in October and we were working on a deadline to at least get the back third of the attic finished, where the star treatment (heh) was going to be painted. We did manage to get that part of the room done in time and then when the stars were finished, we finished the rest of the room and the closets.
The stars, by the way, are the most amazingest thing, like, ever. I know some of you were skeptical when we first told you about it, though you've certainly expressed a lot of interest judging from the amount of email we got on the subject. But now that it's up, I can honestly say that it's every bit as awesome as we had hoped it would be. As can our multiple visitors who've seen it firsthand for themselves, since a visit to our house is no longer complete without tramping upstairs, blocking off the windows, and sitting in the dark to point out the constellations on our soon-to-be master bedroom ceiling. We have an arm of the Milky Way, six of the Seven Sisters, more constellations than we can name, two comets, and a crescent moon. Best. Anniversary Present. Evah.
The whole process took the painter guy about three hours. He painted everything in the dark, which I guess makes sense when you think about it. They use a kind of phosphorescent paint, though all but the biggest stars are invisible when the light are on and even the ones you can see in the light are inconspicuous. Unfortunately, we have no pictures of it for obvious reasons so you'll just have to trust us that it's as cool as we say it is. And really, our word should be enough for you, because when have we ever led you astray?
It took five gallons of primer to do the main room, trim, windows, and the closets, four gallons of the "Desert Castle", and a gallon each of the other three colors. For the closets, it took about a gallon and a half of the five gallon bucket our friend gave us.
We didn't actually paint the stripes until after the floor was refinished; once they were up, the whole room really came together. They did what I hoped to accomplish, giving the illusion that the kneewalls are taller than they are and "lifting" the ceiling a bit. The effect is subtle, but noticeable.
Once we finished painting the room and closets, we finally felt we were nearing the end of the project. That's one of the things I just love about paint, that it's a real transition from a work-in-progress to a finished project, where all the various aspects of a project, especially a big one like this, finally come together and that picture you've had in your head the whole time suddenly comes to life. We could envision our little reading nook in the dormer, the breakfast area over by the top of the stairs, the bed and nightstands against the accent wall. There's still all the trim -- 508 ft. to be exact -- and the windows to finish painting, as well as the banister and the stair rail, but we're nearly done with painting, which means we're nearly done!